
What This Guide Covers
This guide maps the complete Deductions Reconciliation workflow from start to finish. It's designed to help you understand how each stage connects before working individual tasks — from uploading ERP transactions all the way through exporting reports back to your accounting system.
Where To Find It
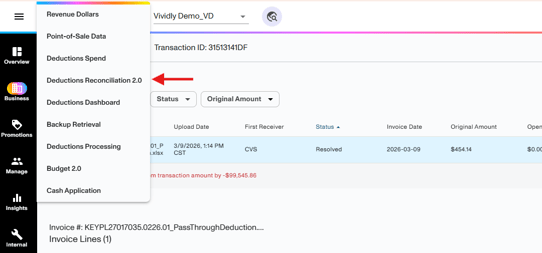
Navigate to Business → Deduction Reconciliation 2.0
Before You Begin
Make sure the following are in place before starting:
- ERP transaction data is ready to upload
(Use either the Vividly upload template or an Excel file exported from your ERP system. If you have an integration, data will sync automatically.) - Backup documents are available
(e.g., check remittances, deduction invoices)
The Complete Workflow
Each step in DRM produces the inputs the next step needs. The workflow moves in one direction — from transaction intake to resolution to reporting.
Step 1 — Upload Transactions from Your ERP
The workflow begins when ERP data enters DRM. Each transaction represents one check and contains the total deduction and repayment amount, customer, check number, and date. Transactions can be added manually, imported in bulk, or synced automatically via ERP integration.

Note: Be sure to download the Sample File when uploading your ERP transaction data to confirm proper information is avaiable on your upload and avoid errors during the upload process. You can also use the Sample File as a template if you don’t have, or are unable to generate, a report from your ERP.
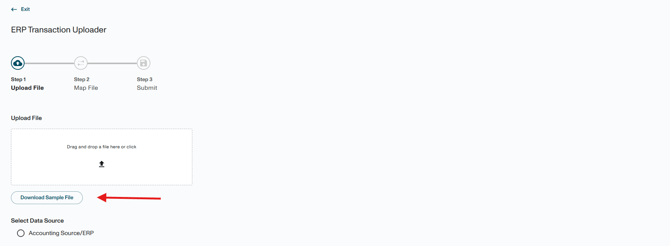
Click here for a step-by-step walkthrough on uploading ERP transactions.
Navigate to Transaction to Work
After uploading your transactions, click on the transaction you want to begin working on.
Step 2 — Attach Backup Documentation
Each transaction should have supporting documentation attached before reconciliation begins—typically the check remittance and individual deduction invoices. In some cases, backup may not be directly available (e.g., for repayments, the original deduction serves as the backup; for OIs, the only backup may be the revenue invoice from your ERP).
Vividly helps automate this process by scanning uploaded files, extracting key details such as customer and check number, and linking each document to the corresponding transaction.
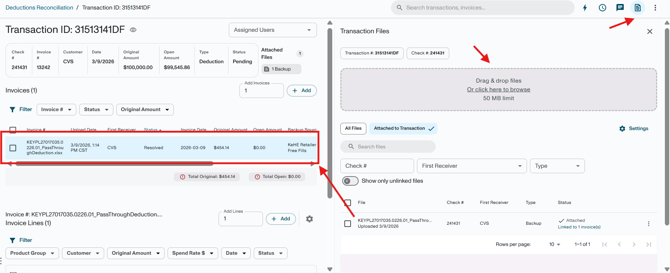
Click here for a step-by-step walkthrough on how to upload backup files.
Step 3 — Create Invoice Headers
The check remit lists each deduction and repayments separately — these become invoice headers in DRM. Invoice Header Automation can scan the attached remit and generate all headers automatically, populating invoice number, date, and original amount directly from the remittance.
Click here to see all DRM Automations
Note: In some cases, you may be able to skip ahead to Step 6 by resolving at the invoice header level. This is recommended for simpler scenarios where there is only one line on the backup and the full deduction can be cleared to a single promotion line or GL account, and has no additional fees.
This approach works well for items handled outside of Vividly (Non-trade) or for distributor allowances.
Small-dollar deductions below a configured threshold can also be cleared automatically at the invoice header level.
See Resolve Low Balance Deductions (Automatically) for setup.
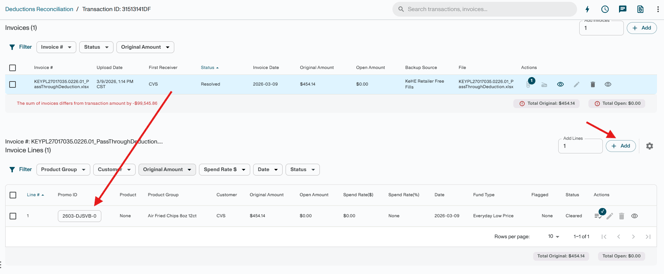
Step 4 — Build Invoice Lines
Invoice lines capture the product-level detail behind each deduction, including product, customer, date, and spend rate.
- Use the Scanner (recommended for complex backup):
The scanner extracts data directly from backup documents, automatically pulling and breaking out key details such as direct/indirect customer, product information, event dates, and spend rate. The system also remembers field mappings by backup source, making recurring formats faster to process. - Manual Entry (for simpler cases):
For simpler scenarios—or when backup is not supported by the scanner—you can manually add invoice lines and edit the details as needed.
Step 5 — Match Deductions to Promotions
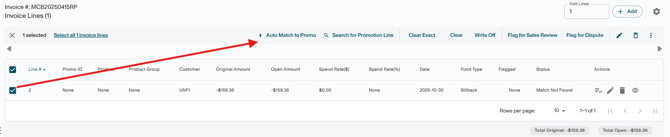
With invoice lines built, use the Auto-matcher to link each line to a planned promotion, as appropriate. It compares customer, product, promotion type, timing, and spend rate to surface the best match candidates.
Fund type recommendations may also be suggested based on invoice number patterns.
All results are suggestions only—your team should review, confirm, or adjust each match as needed.
Step 6 — Resolve Each Deduction
Each invoice line is resolved using one of three actions:
-
Clear or Clear Exact — Confirms the deduction matches a planned promotion and closes the line.
- Write-Off — Closes minor amounts, or non-trade deductions, by routing them to a designated GL account.
- Offset — Link a deduction to a related repayment
Or flag lines for further review using one of two action:
-
Sales Review — Flags the item for your sales team when no matching promotion exists.
-
Dispute — Flags for team to summit a formal dispute for charges that appear invalid or unsupported by documentation.
Items flagged for Sales Review or Dispute are tracked in the Miss Log for team collaboration and follow-up.
When Flagging:
- Include relevant details for the salesperson to review in the comments. Provide any additional context needed to validate the expense beyond what is shown in the invoice line
- Tag and assign the item to the appropriate user (typically the salesperson responsible for that customer/account)
Click here for a full walkthrough on when and how to flag invoice lines for Sales Review and Dispute.

Note: Before assigning Sales Review or Dispute, ensure the invoice line includes key details (product group, customer, spend rate, date, and trade type). Providing complete information helps the sales team quickly validate the expense against their promotion calendar.
Step 7 — Export Reports for Your ERP
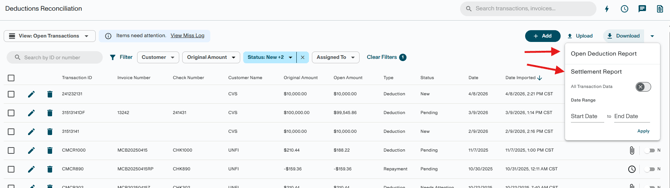
Once resolved, export results using the download icon in Deduction Reconciliation:
-
Settlement Report — All resolved deductions with GL account and cleared date. Used to post journal entries in your ERP.
-
Open Deductions Report — All unresolved deduction lines. Used to monitor and prioritize open work.
ERP integration can automate the settlement export entirely, eliminating manual downloads, and journal entries creation.
Key Terms
-
Transaction — Basic check-level information, including ERP credit memo number, check number, paying customer, and the total amount of deductions and payments associated with the check.
Invoice Header — Each individual deduction or repayment item listed on the check remittance.
Invoice Line — Product-level or fee-level breakdown of a deduction.
Auto-matcher — Vividly’s tool that suggests matching promotions for each invoice line.
Below Threshold — Automation that automatically clears small-dollar deductions below a configured amount.
Missed Log — Queue for items flagged for Sales Review or Dispute.
Settlement Report — Export of all resolved deductions used for ERP posting.
Open Deductions Report — Export of all unresolved deductions.