
What Is the File Manager?
The Backup Files Manager is DRM’s central library for all backup documentation. It stores every file uploaded to your Vividly portal in DRM — including check remittances, deduction invoices, and supporting documents — and organizes them by Customer and Check Number.
From the Backup Files Manager, users can:
- Upload new files
- View existing files
- Download files
- Delete files as needed
Where To Find It?
The Backup Files Manager is accessible from two locations in DRM:
-
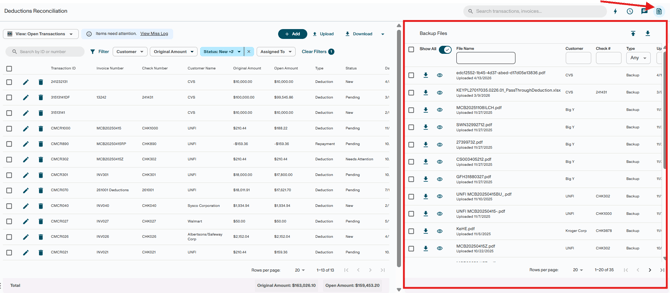
As a standalone library, navigate to Business → Deduction Reconciliation and click the Backup Files icon
 to open the Backup Files tab. This view displays all uploaded backup files in the portal.
-
From within any transaction, click the either of the Backup icons. This view will default to showing backup files attached to the current transaction, but you can also view all files by adjusting the filters.
You can also upload backup files directly from this view.
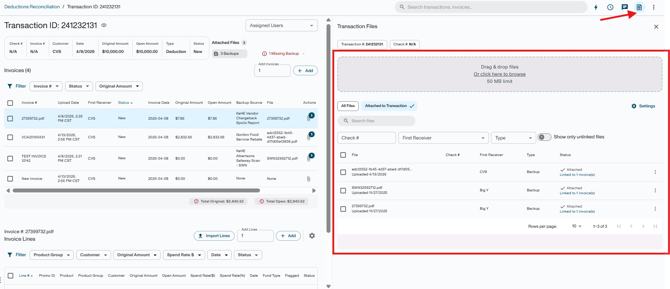
Transaction Files Manager View
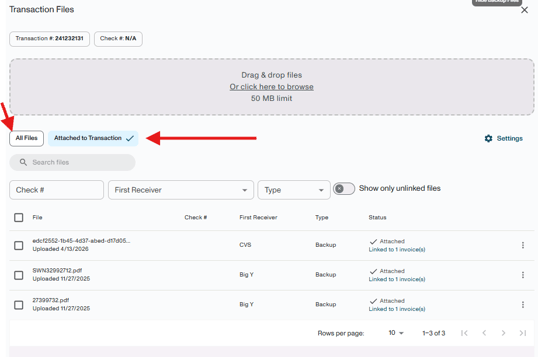
The Transaction File Manager has two views of the file library:
All Files
Shows every file uploaded to DRM, regardless of whether it has been assigned to a transaction. Use this view to browse, search by check number or file name, or upload files you'll link to transactions later.
Attached to Transaction
Shows only the files currently linked to the current transaction — typically one check remit and any associated deduction and repayment invoices. This is the view you'll use during active reconciliation.
Ways to Add Files to DRM
There are three methods for getting backup files into DRM. Choose based on your volume and workflow.
Option 1 — Upload Within a Transaction (Best for Individual Transactions)
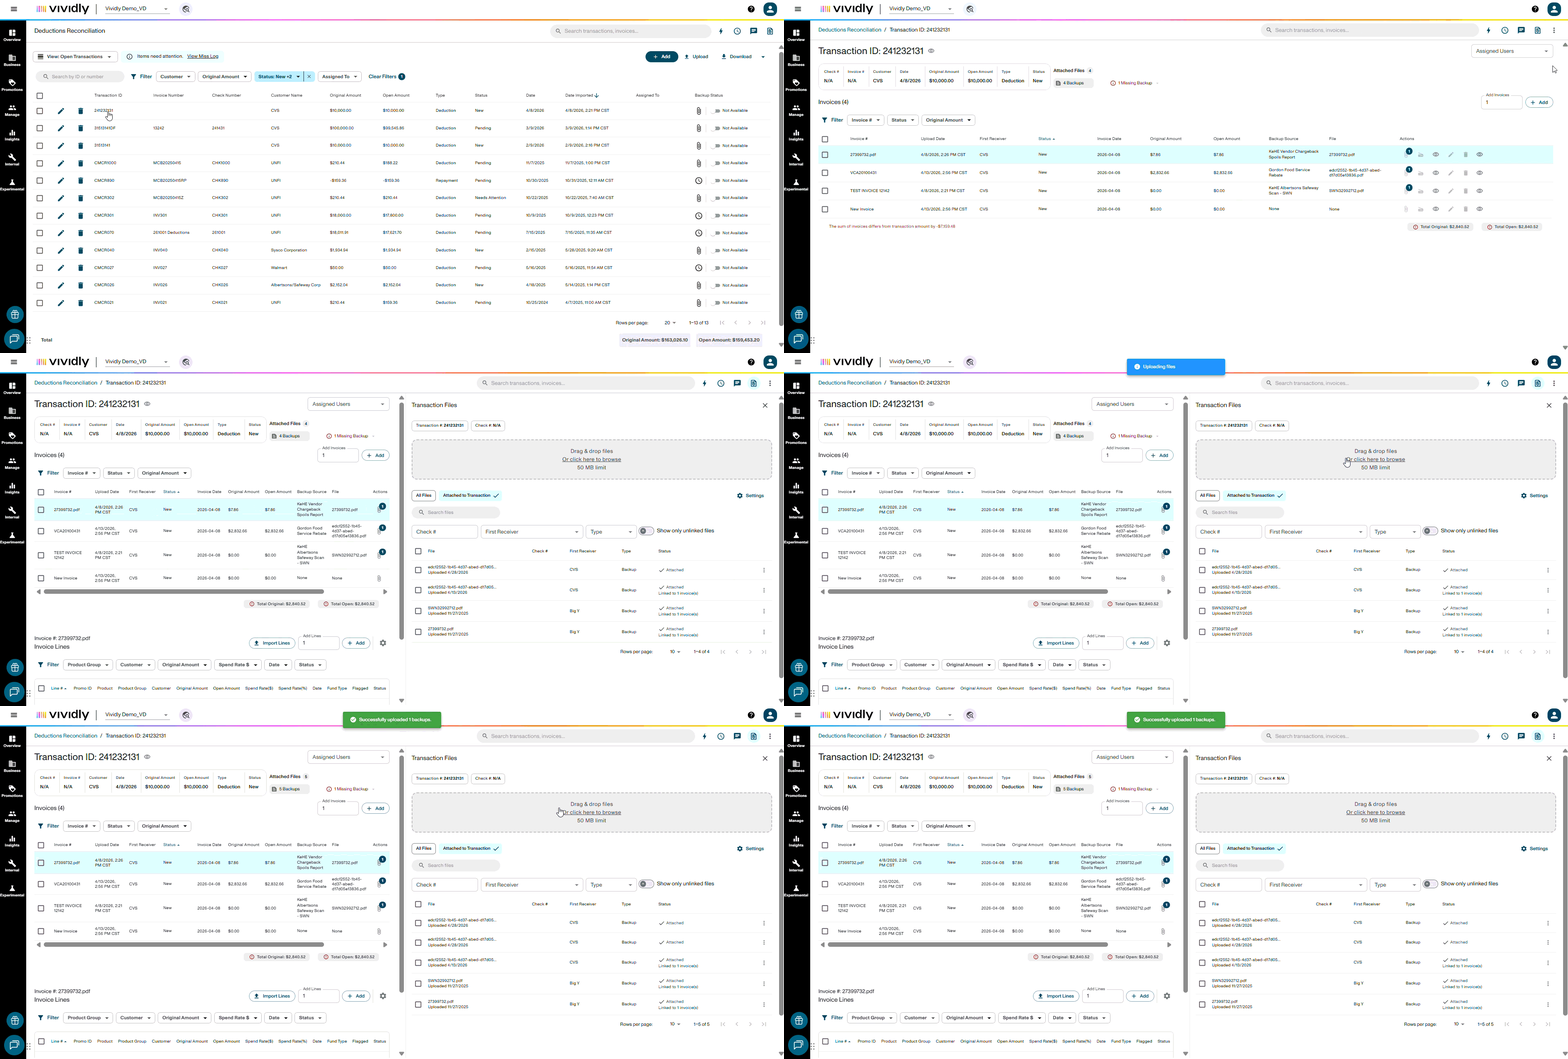
Open any transaction and click the Backup icon. From the uploader:
-
Drag and drop your file(s), or click click here to browse to select files from your computer.
-
You can attach multiple files per transaction — check remit, backup invoices, contracts, or any document needed for validation or audit.
-
Files uploaded here automatically link to that transaction — no separate linking step required.
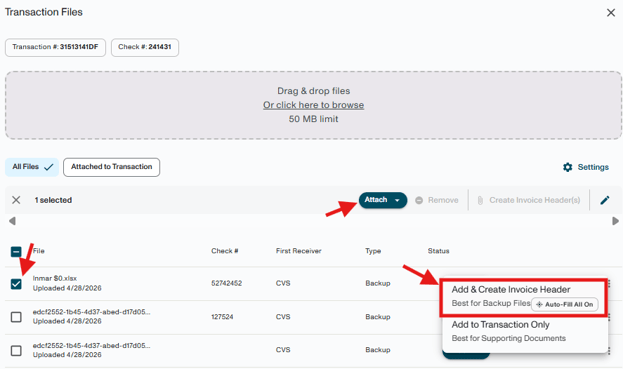
Once files are in the library, use Add & Create Invoice Header from within a transaction to create invoice headers from attached files in a single action when you do not have the remittance and/or are not using the Invoice Automation workflow.
This process creates:
- One invoice header per file
- Pre-populated fields based on backup scanning
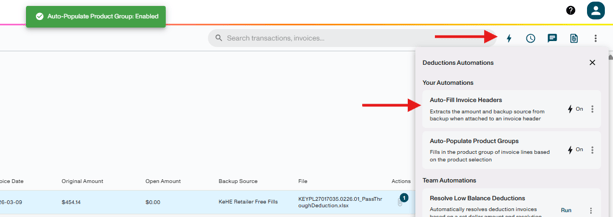
Click here to view DRM Automations and setup instructions.
Tip: Enable the Auto Fill Invoice Headers setting before uploading. It reads the attached file and pre-populates key invoice header fields, reducing manual data entry on the next step.
Option 2 — Upload via the Backup Files Tab (Best for Batch Uploads)
Use the Backup Files tab to upload files in bulk before assigning them to transactions. This is useful when remits and backup arrive ahead of ERP transactions.
-
Drag and drop files into the tab.
-
Optionally add the First Receiver, Check Number, and File Type (Backup or Remit), though this information should automatically populate after confirming the backup upload.
-
DRM automatically matches uploaded files to transactions when they arrive, by customer and check number.
Option 3 — Backup Retrieval Service (Best for High-Volume Teams)
The Backup Retrieval Service (BRS) uses automated scrapers to pull remit and backup files from retailer portals and email inboxes. Files are loaded into DRM and linked to transactions automatically — no manual upload required.
Note: BRS availability depends on your Vividly subscription. Contact your Customer Success Manager or support@govividly.com to confirm access or to sign up.
Efficiency Tips
-
Always enable Auto Fill before attaching files within a transaction. It reads the uploaded document and pre-populates invoice header fields, saving manual entry.
-
Use Add & Create Invoice Header when multiple files are attached to a transaction. It creates all invoice headers in one action — one per file — with fields auto-populated from scanning.
-
Pre-upload backups via the Backup Files tab if remits arrive before your ERP transactions.
-
Attach everything you need in one place: DRM supports multiple files and formats per transaction — include the check remit, deduction invoices, and any contracts or validation documents together.
Key Terms
-
Backup File Manager — Vividly's library for all backup files within DRM, accessible from within transactions or via the Backup Files tab.
-
Backup — Any supporting document attached to a deduction (check remit, deduction invoice, contract).
-
Remit — The check remittance document that itemizes each deduction on a check.
-
Auto Fill — A setting that reads an uploaded file and pre-populates invoice header fields automatically.
-
BRS (Backup Retrieval Service) — Automated service that pulls backup files from retailer portals and email inboxes directly into DRM.