
Overview
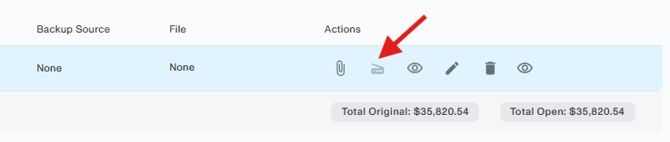
The Deduction Scanner in Vividly converts retailer and distributor backup PDFs into structured invoice lines, eliminating manual data entry for large or multi-page deduction backups. Once a backup file is linked to an invoice inside a DRM transaction, you can click "Scan" to extract all line-item detail in seconds. The system maps the extracted data to required fields, remembers your column mapping for future scans, and flags any unrecognized customers or products so you can fix them before importing.
When to Use This
-
Your backup file is a multi-page PDF with many individual line items (e.g., UNFI MCB, KeHE, Kroger)
-
You want invoice lines auto-populated so the auto-matcher can find promotions efficiently
-
You need to process a large batch of backup files at once (use the batch scanning path)
-
Your backup is from a supported retailer or distributor template
Prerequisites
-
A transaction must already exist in DRM (created manually, via ERP upload, or via ERP integration)
-
At least one invoice header must be created within the transaction before scanning
-
A backup file (PDF) must be linked to the invoice header you want to scan
-
The backup source template for your file must be supported
Choosing your Scanning Path
| Path | Best for | Where to start |
|---|---|---|
| Path A: Scan within a DRM transaction | Single invoices; typical day-to-day DRM reconciliation | Business > Deductions Reconciliation |
| Path B: Batch scan via Deductions Processing | Multiple backup files at once; Kroger, KeHE Bulk MCB | Business > Deductions Processing |
Path A: Scan Within a DRM Transaction
Use this path when you are working inside a transaction and want to scan the backup attached to a specific invoice.
Step 1 — Open Your Transaction And Invoice
-
Navigate to "Business" > "Deductions Reconciliation".
-
Locate and open the deduction transaction you are working on.
-
In the Invoice Header section, find the invoice you want to create lines for.
-
Confirm that a backup file (PDF) is linked to that invoice. If not, attach one via the File Manager or by uploading directly to the invoice header.

Step 2 — Assign A Backup Source Template (If Not Already Set via Auto-Fill)
-
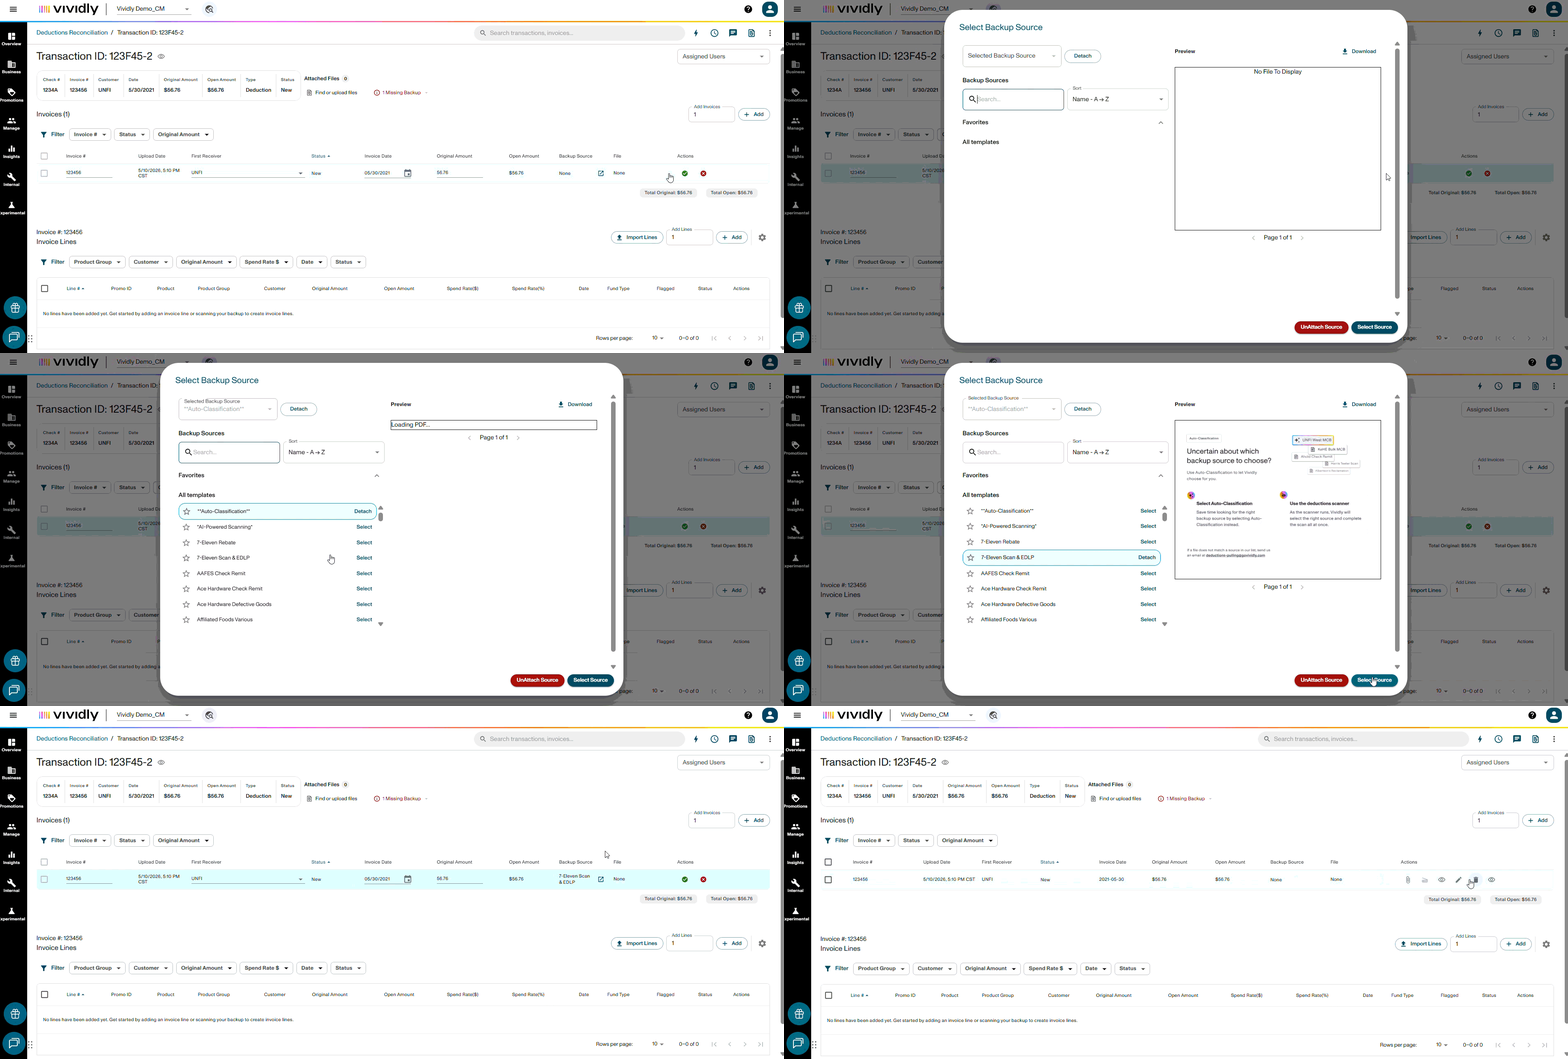
Click the edit (pencil) icon on the invoice header.
-
In the "Backup Source" field, select the appropriate template for your file:
-
Choose your specific backup source (e.g., "UNFI West MCB," "KeHE MCB," "Kroger"), or
-
Select "Auto Classification" to let the system detect the template automatically. This option takes slightly longer but is recommended if you are unsure which template to use.
-
-
Save the invoice header.
Step 3 — Scan The Backup File And Review Errors
-
With the invoice header open, click the "Scan" button associated with the linked backup file.
-
The scanner reads the PDF and opens the column mapping screen.
-
First time scanning this backup source template: you will map each column from the scanned file to the corresponding Vividly field (see Column Mapping below).
-
Template scanned before: the system uses your saved mapping. Review it and click "Next" to proceed.
-
-
After mapping, the scanner previews the extracted data. Each row is flagged:
-
Red (Error): This row will not import. Common causes: customer name not recognized, product code not found in Vividly.
-
Yellow (Warning): This row can be imported but may have incomplete data (e.g., missing product). You can fix it before importing or proceed as-is.
-
-
Fix the errors accordingly and repeat the upload process. Once errors are resolved (or you have decided to proceed with warnings), click "Finish".
Expected Result
You should see invoice lines created in the invoice, each populated with customer name, product, date, amount, and spend rate (where available in the backup).
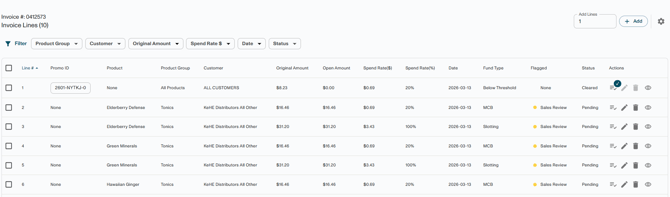
Note: If your backup contains an admin fee (also called "EP Fee"), the scanner automatically detects it and creates a separate invoice line. That line uses the transaction's customer name and the date from the file. It does not include a product name or spend rate.
Column Mapping
When scanning a backup file for the first time, or when importing via "Import Lines," you will be prompted to map columns from the file to Vividly's fields.
| Field | Required? | Notes |
|---|---|---|
| Vividly Customer Name | Required* | Maps to Customer Name, Customer Division Name, or Vividly Customer Name. We recommend using Vividly Customer Name for MCBs when there is >1 retailer listed. |
| Date | Required* | Use the month that best matches the planned promotion in Vividly (affects auto-matcher accuracy). If the backup crosses two months, use the month the promotion was planned. |
| Amount | Required* | The deduction dollar amount column. Often called "Extended Amount" |
| Product Name | Optional (recommended) | UPC, Item Number, or Product Description |
| Spend Rate | Optional (recommended when applicable) | Dollar spend rate per unit. Often calculated as "Extended Amount / QTY" |
| Spend Rate (%) | Optional | Percentage spend rate (For files that use percentages instead of dollar rates) |
| Admin Fee | Optional | Auto-detected by the scanner; pre-populated if an Admin Fee or EP Fee column exists in the file. Creates an additional invoice line with Customer Name equal to the Transaction Customer Name and no assigned product. |
Column mappings are saved after your first scan for a given backup source template, at the account level. You will not be prompted to remap on future scans unless the file's column names change.
Troubleshooting
Problem: Scan Returns a "Failure" Status or "Maybe Success" (no lines extracted)
Likely cause: The backup source template does not match the uploaded file, or the file format is not recognized.
Fix: Try selecting a different template, or switch to "Auto Classification." If the issue persists, the template may not yet be supported. Contact Support to request a template review or a new template.
Problem: After Scanning, Amounts or Dates Are Mapped To The Wrong Columns
Likely cause: Column mapping was saved incorrectly from a previous scan.
Fix: In the column mapping screen, manually update the field mapping to point to the correct columns.
Frequently Asked Questions
When Should I Use The Scanner Vs. Manually Adding Invoice Lines?
Use the scanner whenever your backup PDF has more than a few line items, or when you need product-level detail for accurate auto-matching. For simple deductions with 2–3 lines and a known promotion, manual line entry or direct promotion assignment can be faster.
What File Formats Does The Scanner Support?
The scanner primarily reads PDFs. If your backup is already in Excel or CSV format, use "Import Lines" within the DRM transaction instead of the Scan button. The standalone Deductions Processing tool (Path B) also accepts .xlsx, .xls, and .csv files.
My Backup Source Is Not In The Supported Templates List. What Do I Do?
Email deductions-pulling@govividly.com with 3–5 example files and a brief description of the deduction or check. Typical turnaround is approximately 4 weeks. You will be notified by email when your template is ready.
Can I Re-Scan A Backup After Fixing Product Or Customer Mapping Errors?
Yes. After adding missing alt codes or alternative customer names, return to the invoice, delete any incorrectly created lines if needed, and click Scan again to re-run the extraction.