
Overview
The Revenue Dollars feature in Vividly allows you to upload revenue-generating shipment data from your ERP system, as well as syndicated point-of-sale data from sources like Circana, Nielsen, SPINS, and other data providers. This data is essential for powering insights throughout the platform, including accrual tracking, trade rate analysis, forecast accuracy, and promotion ROI calculations. By maintaining up-to-date revenue data, you can extract actionable insights to understand how your organization is performing and make informed decisions about trade spending.
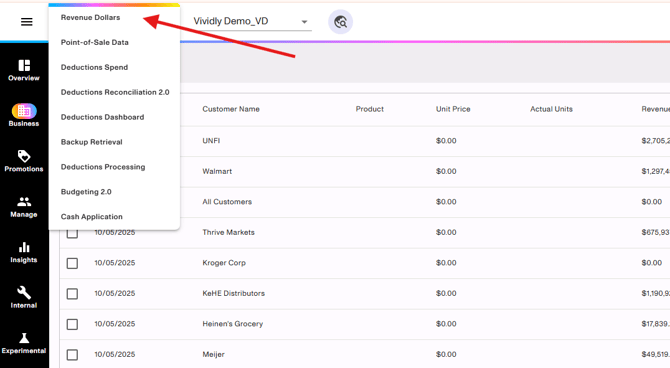
Revenue Dollars is located in the Business section of Vividly's navigation menu. Once you click on the Business icon on the left side of your screen, you'll find Revenue Dollars at the top of the list. This is where all revenue uploads are managed, and where you can view, download, and troubleshoot your uploaded revenue data.
Common Issues
Troubleshooting Revenue Upload Errors - Overview
During step 3 of the revenue upload process, Vividly's error checker identifies three main types of upload errors: Customer Not Found, Product Not Found, and Pricing Not Found. You can still complete your upload with errors present—only the lines with errors will be ignored, while correctly mapped data will be added to the system.
-
Navigate to Business > Revenue Dollars in the Vividly platform
-
Click Load from File to begin your revenue upload
-
Upload your Excel or CSV file (must be single-tab with required fields: Date, Customer Name, Product Name/Code, and Revenue or Actual Sales)
-
Select your file type (Accounting Source for ERP data, or SPINS/WFM/other for syndicated data)
-
Once in "Step 3: Submit" page, review any errors that appear in red or yellow
-
Check the boxes next to each error or warning to filter the data with that specific error or warning
-
Click Download from current view to export a CSV file of all error rows for easier review
-
Identify which type of error(s) you're encountering (Customer, Product, or Pricing)
-
Follow the specific resolution steps for each error type (Described below)
-
After making corrections in Vividly, return to Revenue Dollars and re-upload your file
-
Click Submit to complete the upload (only error-free lines will be added)
Revenue Upload Error - Customer Not Found
This error occurs when a customer name or customer code in your upload file doesn't match any customer profile or alternative name currently stored in Vividly. To resolve this, you'll need to add the customer name from your file as an alternative name in the corresponding customer profile within Vividly's Manage > Customers section.
- In the error screen during upload, note the exact customer name(s) causing the error (e.g., "Publix Corp-RMA")
- Check the box next to this error to filter the data
- Click Download from current view to export the error list for reference, once downloaded, open your file
- Navigate to Manage > Customers in Vividly
- Use the search function to locate the correct customer profile (e.g., search for "Publix")
- Click into the customer to open its profile
- Scroll down to the Enter Alternative Names section
- Paste or type the customer name exactly as it appears in your upload file
- Click Add New Alt Name(s) and then on Save Changes to add the alternative name
- As a best practice, add a tag to identify the data source (e.g., "Syndicated Data" or "Circana") by clicking Add, edit, remove tags
- Return to Business > Revenue Dollars and re-upload your file
Revenue Upload Error - Product Not Found
This error appears when a product code or UPC in your revenue file doesn't exist within any product profile in Vividly. You'll need to either add the missing product code as an alternative identifier to an existing product profile, or create the product in Vividly's Manage > Products section.
-
During the upload error screen, note which product codes or UPCs are not being recognized
-
Check the box next to this error to filter the data
-
Export the error list by clicking Download from current view
-
Navigate to Manage > Products in Vividly
-
Search for the product that should match the missing code
-
Click into the product profile to open it
-
Scroll to the Alternative Product Codes or UPC section
-
Add the missing product identifier exactly as it appears in your upload file by typing it in the "Add new product code(s)" textbox and pressing "Enter" in your keyboard when done
-
Click Save Changes to update the product profile
-
If the product doesn't exist at all in Vividly, you may need to create a new product profile, see the steps on how to do it in our articles called: "How to add individually new products in the “Products” page?" or "How to add products in bulk in the “Products” page?"
-
Return to Business > Revenue Dollars and re-upload your file
Revenue Upload Error - Pricing Not Found
This error means that while both the customer and product were found in Vividly, there is no valid pricing entered for that specific customer-product combination. To fix this, you'll need to navigate to Manage > Pricing and enter the appropriate price for that product group and customer pairing.
-
Note the customer-product pairs that are generating pricing errors during upload
-
Check the box next to this error to filter the data
-
Export the error list by clicking Download from current view
-
Navigate to Manage > Pricing in Vividly (note: this module may take a moment to load)
-
Search for the customer mentioned in the error
-
Locate the product group that contains the UPC or product from your upload file
-
Check if pricing exists for that customer-product group combination
-
If no pricing exists, enter the appropriate unit price for that customer and product group
-
Click Save to apply the pricing. For more details on how to edit pricing, check our "How to edit pricing data and add new pricing time frames so such pricing is effective within a specific timeframe?" article.
-
Important: If pricing already exists but you're still seeing errors, check for pricing conflicts—ensure the product is not in multiple product groups that both have "Pricing" toggled ON. If duplicates are found, turn off the pricing toggle for duplicate product groups (keeping it on only for the primary group used for pricing)
-
Return to Business > Revenue Dollars and re-upload your file