Context: What tools and actions do we have available in Vividly for promotion lifecycle management?
Vividly' provides comprehensive tools to move promotions through their lifecycle—from initial planning (Pending) through approval stages (Submitted, Approved) to execution (Running, Completed) and final closure (Closed). This workflow ensures proper oversight, financial control, and accurate accrual management throughout the promotion lifecycle.
The workflow management features are accessed through Promotions > Planning or any other section and include both manual drag-and-drop capabilities and bulk action interfaces for efficient processing of multiple promotions simultaneously. The system combines user-initiated status changes with automated progressions based on promotion dates, creating a seamless workflow that balances control with efficiency.
Key workflow capabilities & important concepts.
In this article, we'll focus on the following set of capabilities:
-
-
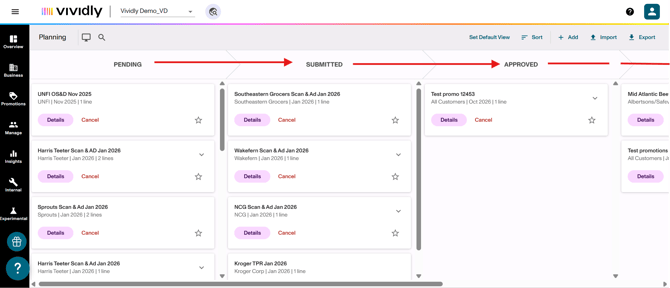
Column view (Drag-and-Drop action): The Planning interface displays promotions in columns organized by status (Pending, Submitted, Approved, Running, Completed). Users can manually drag individual promotions between columns to change their status, providing a visual, interactive way to manage the workflow one promotion at a time.
-
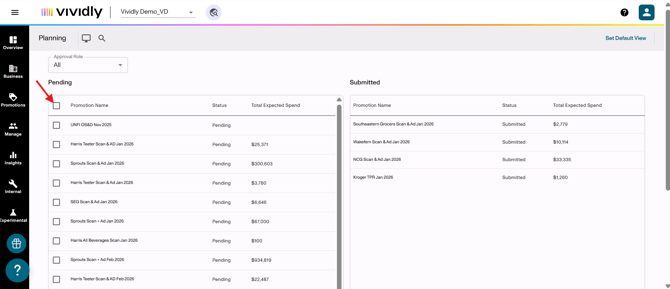
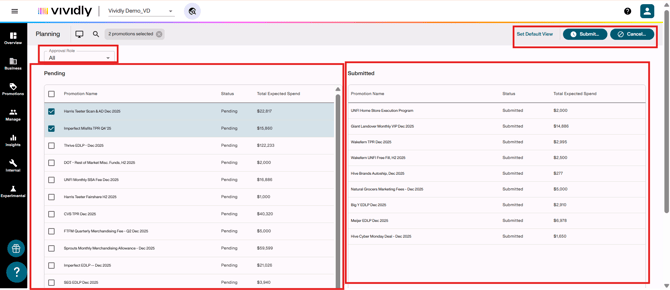
Bulk interfaces (Approval, Submission and Open/Close Lines interfaces): For processing multiple promotions efficiently, Vividly provides dedicated interfaces accessible via the "interface" icon (computer monitor symbol) in the top menu.
-
The Submission interface handles Pending→Submitted transitions.
-
The Approval interface manages Submitted→Approved/Declined/Cancelled actions.
-
-
Role-based approval limits: Users are assigned to roles with specific approval authority ranges defined by Total Expected Spend thresholds (e.g., $0-$5,000, $5,000-$50,000, $50,000+). These limits control which promotions each user can approve, ensuring financial controls are enforced. Users attempting to approve promotions beyond their authority will be restricted or the promotion will revert to Pending status requiring higher-level approval.
-
Promotion Closure: Closing a promotion prevents any additional deductions from being paired to it and signals that all expected spending has been realized. Closed promotions drop off the accrual report because they're considered fully actualized. Closure can be performed at the full promotion level (all lines closed simultaneously) or at individual line levels (allowing partial closure when some fund types are complete while others remain open).
-
Key fields and settings to understand.
Most of these fields and functionalities can be found in multiple articles of ours like: "Promotions > Planning: Bulk actions views" and "Promotions > Planning: Column view". For the purpose of this article, we'll focus on the following:
In general:
-
-
Promotion Status: Controls where the promotion appears in the workflow and determines system behaviors. The standard progression is Pending → Submitted → Approved → Running → Completed → Closed. Each status change triggers specific actions: Approved promotions automatically progress based on dates; Completed promotions are eligible for closure; Closed promotions reject new deduction pairings.
-
Open/Closed Line Status: Each promotion line has an independent open/closed state indicated by a padlock icon (open lock = deductions can be paired; closed lock = no more deductions accepted). The closure state affects accrual calculations and deduction pairing eligibility.
-
Column view.
Columns view is the interface where promotions are pilled according to their status.
-
- Pending: Initial and default status for newly created promotions that are still being finalized before submission for approval.
- Submitted: Status indicating promotion has been finalized and submitted for internal approval review.
- Approved: Status indicating promotion has been reviewed and approved to proceed, ready to execute when start date arrives.
- Running: Status indicating promotion is currently executing in-market during its scheduled time period. System automatically transitions from Approved to Running on start date.
- Completed: Status indicating promotion has finished its scheduled run period and system has automatically moved it to completed. Promotion remains open for deduction application and reconciliation.
Additional statuses not included as columns but that can be set to promotions:
-
- Declined: Status for promotions that were submitted for approval but rejected. Declined promotions are removed from column view and accessible only through the Declined subsection.
- Cancelled: Status for promotions that were planned but will not execute. Cancelled promotions are removed from column view and accessible only through the Cancelled subsection.
Submission view.
-
-
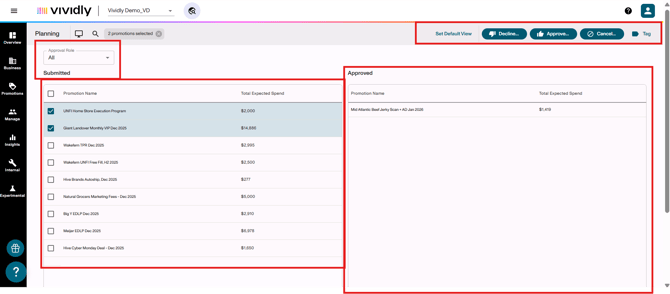
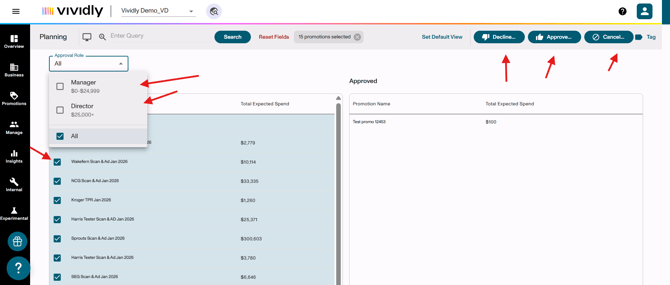
Approval Role dropdown: Filter that allows users to view promotions by specific approval role.
-
-
-
Pending list: Left side of screen showing all promotions in "Pending" status.
-
-
-
Submitted list: Shows promotions successfully submitted, awaiting approval step.
-
-
-
“Submit” button: Button that allows you to submit checked/selected promotions.
-
“Cancel” button: Button that allows you to cancel checked/selected promotions.
-
Approval view.
-
-
Approval Role dropdown: Same as Submission view - filter by approval role.
-
-
-
Submitted list: Left side of screen showing promotions in "Submitted" status awaiting approval.
-
-
-
Approved list: Right side of screen showing promotions that have been approved.
-
-
-
“Decline” button: Button that allows to decline checked/selected promotions.
-
-
-
“Approved” button: Button that allows to approve checked/selected promotions.
-
-
-
“Cancel” button: Button that allows you to cancel checked/selected promotions.
-
“Tag” button: Button that allows you to add a tag to selected promotions.
-
Open/Close Lines view.
-
-
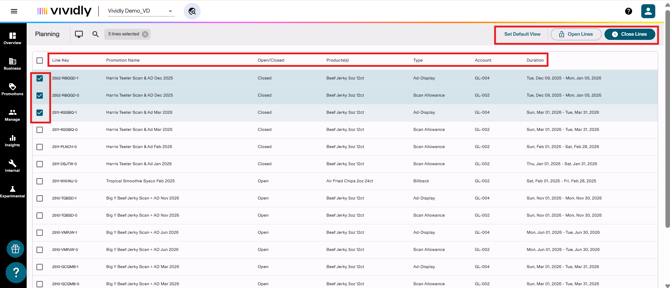
“Line Key” column: Unique identifier for each promotion line/fund type.
-
-
-
“Promotion Name” column: Name of the referred promotion.
-
-
-
“Open/Closed” column: Status indicator showing if line is open or closed.
-
-
-
“Product(s)” column: Products or product groups included in the promotion line.
-
-
-
“Type” column: Fund type/promotion type for the line.
-
-
-
“Account” column: GL account associated with the fund type.
-
-
-
“Duration” column: Start and end dates of the promotion line.
-
-
-
“Set Default View” button: Saves current filter/sort configuration as default.
-
-
-
“Open Lines” button: Action button to open selected closed promotion lines.
-
“Close Lines” button: Action button to close selected open promotion lines.
-
Steps to manage promotion workflow through status changes and closure.
Drag-and-drop status changes (manual, one-by-one).
1. Navigate to Promotions > Planning to access the Column View interface showing promotions organized by status columns.
2. Locate the promotion you want to move by scrolling through the appropriate status column or using the search bar to filter.
3. Click and hold on the promotion card you want to move.
4. Drag the promotion card to the desired status column (you can skip columns—for example, moving directly from Pending to Approved without going through Submitted).
5. Release the mouse button to drop the promotion into the new column; the status will update immediately and the change will be logged in the promotion's activity history.
Note: If the promotion's Total Expected Spend exceeds your role's approval limit, you will not be able to drag it to Approved or Declined status—the system will prevent the action or revert the status change.
Submission interface (Bulk move pending to submitted).
1. From Promotions > Planning, click the interface icon (computer monitor symbol) in the top menu bar.
2. Select Submission from the dropdown menu to open the Submission interface.
The interface displays all promotions currently in Pending status, showing their expected spend, customer, dates, and other key details.
3. Optional step: Use the Search bar for simple filtering (e.g., type a customer name), or click the Advanced Search icon (magnifying glass) to filter by multiple criteria such as customer, month/year, fund type, promotion tags, or creator.
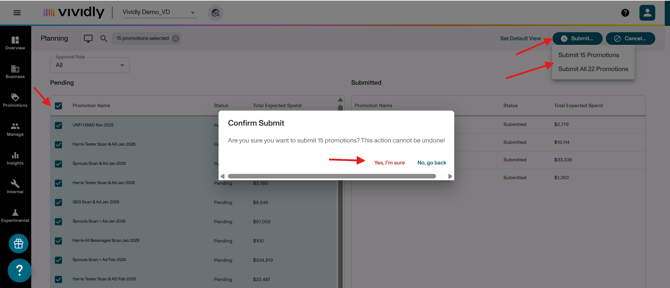
4. Select promotions to submit by checking the boxes next to individual promotions, or click the checkbox at the top of the list to select all promotions visible on the current page (typically 15 at a time).
5. Click the Submit button at the top of the interface, then select if you want to submit all the promotions available in the page OR ALL the available promotions ready for submission (including those ones in another page). Basically:
Choose the appropriate option:
-
-
Submit Selected: Only the checked promotions move to Submitted status
- Submit All Filtered: All promotions matching your search criteria move to Submitted, regardless of page selection
-
6. A confirmation dialog will appear asking whether you want to submit only the selected promotions (those with checkmarks) or submit all promotions matching your current filters (even those on other pages beyond what's visible). Click on "Yes, I'm sure" to confirm, "No, go back" to cancel.
7. Confirm the action; the promotions will immediately move from Pending to Submitted status and appear in the Submitted column when you return to Column View.
Approval interface (Bulk approve, decline or cancel).
1. From Promotions > Planning, click the interface icon (computer monitor symbol) in the top menu bar.
2. Select Approval from the dropdown menu to open the Approval interface.
The interface displays all promotions currently in Submitted status awaiting approval review.
3. Optional step 1: Use the Search bar or Advanced Search (magnifying glass icon) to filter promotions by customer, month/year, expected spend range, or other criteria to narrow your review.
4. Optional step 2: Use the Approval Role filter dropdown to display only promotions within your approval authority range, hiding deals above or below your limits.
5. Review promotion details by clicking on the promotion to open a side panel showing the promotion's full information without leaving the interface.
6. Select promotions for action by checking boxes next to individual promotions or using the top checkbox to select all visible on the page.
7. Click one of following action buttons at the top:
-
-
-
Approve: Moves selected promotions to Approved status (only available if Total Expected Spend is within your approval limit).
-
Decline: Moves promotions to Declined status, indicating they were reviewed and rejected.
-
Cancel: Moves promotions to Cancelled status, removing them from active workflow.
-
-
8. Similar to Submission, you'll be prompted to act on Selected promotions only or All filtered promotions matching your search criteria.
9. Confirm your action; promotions will move to the appropriate status column (Approved, Declined, or Cancelled).
Note: If you lack sufficient approval authority for a promotion's spend level, you will not see "Approved" or "Declined" as available options, and attempting to approve will trigger an error message or revert the status.
Open/Close Lines interface (Bulk closure).
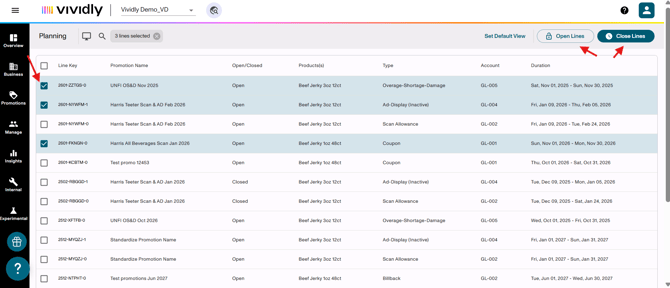
1. From Promotions > Planning, click the interface icon (computer monitor symbol) in the top menu bar.
2. Select Open/Close Lines from the dropdown menu to access the bulk closure interface.
3. The interface displays all promotion lines (not full promotions) that are available for closure, showing their current open/closed status, expected vs. actual spend, customer, and dates.
4 Use the Advanced Search feature (click magnifying glass icon twice to expand full filters) to narrow down which lines you want to close. Common filter strategies are:
-
-
- Year: Filter to a specific year (e.g., 2024) to close all prior-year promotions
- Month: Filter to specific months (e.g., June, July, August) to close promotions from X months ago
- Customer: Close all promotions for a specific retailer
- Open/Closed Status: Filter to show only "Open" lines to avoid reprocessing already-closed promotions
- Created By: Filter to lines created by specific users if you want to close promotions by salesperson.
-
Best Practice Filter Combination: Select Year = 2024, Month = August (or earlier), Status = Open to identify promotions from 90+ days ago that are ready for closure.
5. Review the filtered list to ensure these are the lines you intend to close. Check the expected vs. actual spend to confirm deductions have been received.
6. Select lines for closure by checking individual boxes or using the top checkbox to select all visible lines on the page.
7. Click the Close Lines button at the top of the interface.
8. To Reopen Lines in Bulk: Use the same Open/Close Lines interface, but filter for Status = Closed, select the lines you want to reopen, and click the Open Lines button instead.
Closure Cadence Recommendation: Many organizations establish a policy such as "Close all promotions 90-120 days after their end date" and execute bulk closures monthly or quarterly using this interface.
Role-based approval filters.
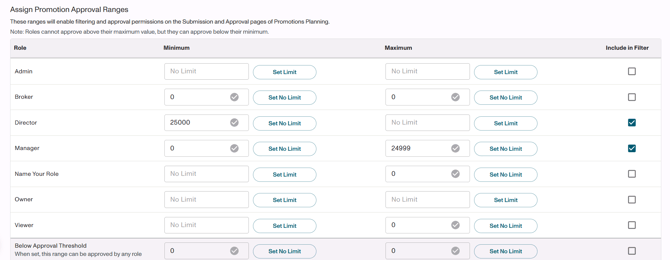
1. Navigate to Account Settings > Permissions > Roles to verify which roles are included in the filter (there will be a checkbox next to each role indicating whether it appears in the filter).
2. Navigate to "Assign Promotion Approval Ranges" section and type the "Minimum" and "Maximum" to delimit the threshold of approval.
3. Optional step: Check on "Include in filter" so a filter is included, so that, when applied, only approvable promotions are shown.
Promotion closure - Manual (Individual promotions or lines).
1. Navigate to Promotions > Planning and use search or filters to locate the promotion you want to close.
2. Prerequisite Check: Verify the promotion is in Completed or Cancelled status—only promotions in these statuses can be closed. Attempting to close a Running or Approved promotion will fail.
3. Click Details on the promotion to open the Promotion Profile view.
4. Locate the padlock icon at the top of the promotion profile (for whole promotion) and within the "Lines" tab > "Specific Line Details" section (for specific promotion lines)
-
-
-
An open padlock (green) indicates the promotion or promotion line is open and accepting deductions.
-
A closed padlock (red) indicates the promotion or promotion line is closed and rejecting new deductions.
-
-
5. To close the entire promotion (all lines simultaneously): Click the padlock icon at the top level of the promotion profile next to the promotion name. The icon will change from open to closed, and all promotion lines will be closed together.
6. To close individual promotion lines (partial closure):
6.1 Click on the Lines tab > "Selected Line" dropdown below the "Specific Line Details" section to view all individual lines (e.g., Scan, Ad, Slotting).
6.2. Select the specific line you want to close.
6.3. Click the padlock icon next to that individual line. That line will close while other lines remain open, i.e. allowing you to close an ad fee line that's complete while leaving a scan line open for additional deductions.
-
-
- No additional deductions can be paired to it (Vividly's deduction matching will skip it)
- It drops off the accrual report because it's considered fully actualized
- The system defaults to using actuals instead of expected spend for that promotion in reporting
-
Reopening: To re-open a closed promotion or line, simply click the closed padlock icon again; it will toggle back to open status and allow deductions to be paired again.
Promotions auto-closure (Account Settings > Miscellaneous).
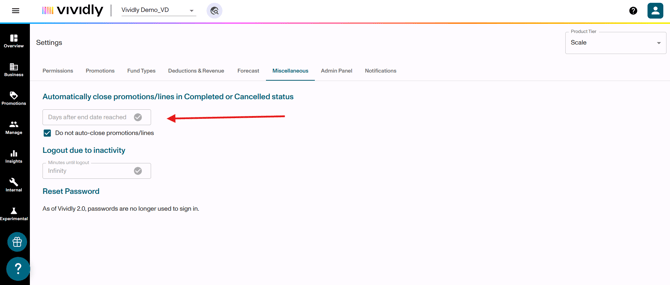
As mentioned in our "How to set up an amount of days for a promotion line to be closed after changing its status to completed or cancelled?" article, the "Automatically Close Promotions/Lines" feature in Vividly provides system-level automation to close promotion lines after a specified number of days following their end date, once a "completed" or "cancelled" status is set up to a promotion. This setting is found in Account Settings → Miscellaneous tab and helps maintain clean promotion data by automatically finalizing promotions that have completed their performance window.
The way this feature works is that it runs as an overnight automated process that scans your portal for eligible promotions, and closes promotions that are in Completed or Cancelled status after a designated number of days beyond the promotion's end date. For more details on its logic, you can check the mentioned article. For the focus of this article, we'll outline the steps to set this up:
1. Go to and click on the profile button at the right-upper corner of Vividly's page and click on "Account Settings" button > "Miscellaneous" tab.
2. Go to the "Automatically close promotions/lines in Completed or Cancelled status" and click on the "Days after end date reached" textbox.
3. Type the number of days after end date that must pass before automatically closing a promotion/line.
4. Click on the green checkmark within the textbox when done.
If you want to disable this function, you have two options:
a. Leave the textbox empty.
b. Check the "Do not auto-close promotions/lines" option.
Best practices for promotions workflow management.
-
Move to approved before start date for automation: Ensure all promotions reach Approved status at least one day before their in-store start date. Make approval review and bulk approval a regular weekly or bi-weekly task, not something done ad-hoc or after promotions have already started. Vividly's automatic status progression (Approved→Running→Completed) only works for promotions already in Approved status when their dates arrive. If a promotion is stuck in Pending or Submitted when its start date passes, you must manually drag it to Running and Completed, defeating the automation benefit.
-
Use bulk Interfaces for efficiency, not one-by-one: When you have more than 5-10 promotions to move through workflow stages, always use the Submission and Approval interfaces with filters and bulk selection rather than dragging promotions individually in Column View. Reserve drag-and-drop for quick fixes or single urgent promotions. Processing promotions one-by-one is time-consuming and error-prone when dealing with high volumes (e.g., 50+ promotions pending approval).
-
Establish a closure cadence based on deduction timing: Define an organizational policy for when promotions should be closed (e.g., "90 days after end date," "120 days after end date," or "when actual spend reaches 95% of expected"). Execute bulk closures on a regular schedule (monthly or quarterly) using the Open/Close Lines interface filtered to your closure criteria. Document this policy and train your team to follow it consistently. Leaving promotions open indefinitely inflates your accrual liabilities because the system continues to reserve expected spend even when all deductions have been received. Conversely, closing promotions too early (e.g., 30 days after end date) risks rejecting legitimate late-arriving deductions that should be paired.
-
Don't skip the submitted column in role-based approval workflows: When your organization has multiple approval levels (e.g., Sales Reps create, Managers approve $0-$50K, Directors approve $50K+), don't move promotions directly from Pending to Approved. Require promotions to pass through Submitted status as a signal that they're "ready for review" and have all necessary documentation attached. The Submitted status serves as a quality gate and handoff point between creators and approvers. When sales reps move their promotions to Submitted, they're signaling "I've completed my work, this is ready for your review." If promotions jump directly from Pending to Approved, there's no clear handoff, and approvers don't know which promotions are truly ready vs. still being worked on.
-
Don't close promotions with significant spend gaps without investigation: Avoid using the Open/Close Lines interface to bulk-close promotions without reviewing the Expected vs. Actual spend variance column. Don't close a promotion where actual spend is significantly lower than expected (e.g., expected $10,000, actual $3,000) without first investigating why the gap exists. Large variances between expected and actual spend often indicate missing deductions (retailer hasn't processed all claims yet), data pairing issues (deductions are in the system but not matched to the promotion), or forecasting errors (the promotion didn't perform as expected). If you close a promotion with missing deductions, the unpaired deductions that arrive later will either remain unmatched (creating reconciliation headaches) or get force-paired incorrectly to other promotions.