
Overview
The Map Customer and Product Codes feature in Vividly's Deduction Reconciliation Module (DRM) streamlines the scanning workflow by allowing users to create alternative customer names and alternative product codes directly from the scan review screen—without having to leave DRM and navigate to the Manage section. When Vividly's scanner reads a backup file and extracts customer names or product codes (such as UPCs or distributor-specific product identifiers) that don't currently exist in your Vividly system, these unmapped values are flagged or highlighted during the scan review step. To solve this there are two routes:
(1) Make sure the product code is added as an alternative code and/or the customer is in your customer list, if they aren't in their respective pages, make sure to add them and then correct your file and re-upload it.
(2) Use the Customer and Product codes mapping feature by clicking on the specific customer and product code in order to map it with existing codes and customers.
This inline mapping capability saves significant time during deduction processing, especially when working with new distributors, retailer divisions with unique naming conventions, or products with multiple UPC variations that haven't been previously encountered.
Steps to Map Customer and Product Codes When Scanning
- Navigate to Business > Deduction Reconciliation in Vividly
- Open a deduction transaction that requires backup processing
- Click anywhere on the transaction row to open the transaction details
- Scroll to the invoice header section
- If you haven't already attached the backup file:
- Click Manage Backup or the paperclip icon
- Upload the backup PDF file (Sensible-supported backup files only; CSV/Excel files do not support scanning)
- Close the Manage Backup panel
- In the invoice header section, click the pencil icon (edit) to edit the invoice header
- Select the Backup Source from the dropdown menu
- Example: "UNFI West MCB," "Albertsons Safeway Scan," "KeHE East MCB"
- This tells the scanner what type of backup template to use for reading the file
- Select one or more Promotion Types that apply to this deduction
- Example: MCB, Scan, Slotting, Feature/Display
- Important: This tells the matcher what types of promotions to search for during auto-matching (covered in later steps)
- You can select multiple promotion types if the backup contains mixed types
- Click check icon to Save Changes to update the invoice header
- After saving the invoice header with backup source and promotion types, locate the scan icon next to the backup attachment indicator and click on it.
- A loading indicator may appear briefly while the scan processes.
- After the scan completes initial data extraction, you'll see Step 2: Mapping screen (Step 1: Upload File is jumped because you already have the backup file uploaded).
- The mapping screen shows two columns:
- Left column: Vividly field names (Customer Name, Product Name, Date, Amount, Spend Rate, Spend Rate %, Admin Fee)
- Right column: Column names extracted from your backup file
- The mapping screen shows two columns:
- Verify and adjust the mappings as needed
- Click Next to proceed to Step 3: Submit
- In the Step 3: Submit, the screen shows a preview table of the data that will be imported from the backup file.
- The Review screen displays a table of all invoice lines that will be created from the scanned backup. You'll notice that some cells are highlighted according to errors or warnings encountered in the data.
- Visual indicators for unmapped codes:
- Highlighted rows: Customer names or product codes that are not currently mapped in Vividly will be highlighted (typically in yellow or with a distinct background color).
- Warning messages: You may see messages like "Customer not found" or "Product not found" at the top of the screen.
- Error/warning icons: Small icons next to specific customer or product codes indicating they need mapping.
- Highlighted rows: Customer names or product codes that are not currently mapped in Vividly will be highlighted (typically in yellow or with a distinct background color).
- Visual indicators for unmapped codes:
- To correct this using the map customer and product code feature, locate a row with a highlighted customer name (e.g., "Shaw's Division" shown in yellow) or product code.
- Click directly on the highlighted customer name or product code.
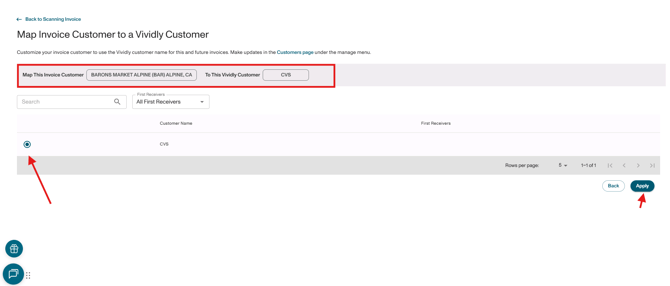
- A customer mapping or Product code modal (popup window) will open with the following sections:
- Top section: Shows the unmapped customer name from the backup file (e.g., "Shaw's Division") and it will show which customer or product code will be associated to once selected
- Search section: Provides a search bar and filter options to find the correct Vividly customer
- In the search bar, begin typing the customer name you want to map this code to. Example: If the backup shows "Shaw's Division," type "Shaw's" to search for the Shaw's customer profile.
- As you type, a list of matching customers or products will appear.
- Review the search results and select the correct customer or product code by clicking the radio button or Select button next to the customer name or product code
- Click on Apply after selecting
- Notice all the rows with the highlighted product code or customer will not be highlighted anymore
Tips & Best Practices
- Review alternative codes and names periodically to avoid doing these types of corrections in the future: During quarterly reviews, audit your alternative customer names and product codes in the Manage section to ensure accuracy and remove obsolete codes or add new ones.
- Avoid adding alt-names with the deductions matching tag that have fewer than 5 characters