
Overview
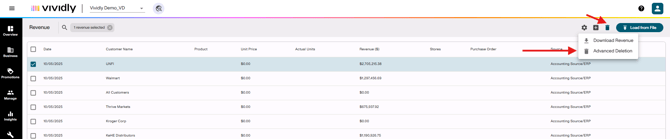
Vividly provides flexible deletion options for managing uploaded revenue data within the Revenue Dollars section. Whether you need to remove a single incorrect entry, delete an entire month of data to re-upload with corrections, or clear out specific revenue sources (like Accounting Source or syndicated data), the platform offers both standard deletion and advanced deletion capabilities. Standard deletion allows you to select and remove individual revenue lines one at a time, while Advanced Deletion provides powerful filtering options to delete multiple entries based on date ranges, revenue sources, customers, or product groups. These deletion tools are essential when you need to correct data errors, update pricing information that affects revenue calculations, or replace partial uploads with complete datasets.
The deletion features are located within the Business > Revenue Dollars section of Vividly. Once you navigate to this module, you'll see all your uploaded revenue data displayed in a table format. The deletion controls are accessible through two main methods:
-
Deletion: The trash can icon for individual or multi-select deletions (by checking on the box next to the row of data that you want to delete). and
-
Advanced deletion: The gear icon in the upper right corner which opens the Advanced Deletion menu. Before deleting any data, it's recommended to use the download function (also accessed via the gear icon) to export your current revenue data as a backup. This ensures you can re-upload if needed without losing important information.
How To Delete Revenue - Deletion + Advanced Deletion
METHOD 1: Standard Deletion (Individual or Multiple Lines)
-
Navigate to Business > Revenue Dollars in Vividly
-
Review the revenue data displayed in the table
-
Optional but Recommended: Before deleting, click the gear (cog) icon in the upper right corner and select Download to export your current data as a backup
-
To delete:
-
Single line: Click the checkbox to the left of the revenue entry you want to delete
-
Multiple specific lines: Click the checkbox next to each line you want to remove (you can select multiple individual entries)
-
All visible lines on the current page: Click the checkbox in the header row (next to the column headers) to select all items on the page
-
-
After making your selections, click the trash can icon (typically located near the top of the table)
-
A confirmation popup will appear asking "Are you sure you want to delete these revenue item(s)?"
- Click Yes, I am sure to confirm, or No, go back to cancel
-
The selected revenue entries will be permanently removed from Vividly
METHOD 2: Advanced Deletion (Filtered Bulk Deletion)
-
Navigate to Business > Revenue Dollars in Vividly
-
Optional but Recommended: Click the gear (cog) icon and select Download to backup your data before deletion
-
Click the gear (cog) icon in the upper right corner of the Revenue Dollars table
-
Select Advanced Deletion from the dropdown menu
-
A new window will appear with several deletion filter options:
-
OPTION A: Delete by Date Range
-
Set your Start date by clicking in the date field (format will be shown as MM/DD/YYYY)
-
Set your End Date to define the range of data to delete
-
Optionally select a Revenue Source (Accounting Source, SPINS, Circana, Nielsen, etc.) to limit deletion to that source only
-
Leave revenue source blank to delete all sources within the date range
-
-
OPTION B: Delete by Revenue Source Only
-
Leave date fields blank
-
Select a specific Revenue Source from the dropdown menu
-
This will delete all entries for that source across all time periods
-
-
OPTION C: Delete All Revenue (USE WITH EXTREME CAUTION)
-
Check the "Delete all revenue entries" checkbox
-
WARNING: This option deletes ALL revenue data ever uploaded, regardless of date range or source. Only use this if you need to completely clear all revenue and start fresh. This is the most dangerous option and should be avoided unless absolutely necessary
-
-
-
After making your filter selections, click Delete Selected
-
A confirmation popup will appear showing "Are you sure you want to delete [X] revenue items?"
-
Important: Review this number carefully to ensure it matches your expectation
- Click Yes, I am sure to confirm, or No, go back to cancel
-
The filtered revenue entries will be permanently removed from Vividly
METHOD 3: Advanced Search + Deletion (Partial/Targeted Deletion)
- Navigate to Business > Revenue Dollars
- Click the magnifying glass icon twice on the left side of the screen to open Advanced Search filters
- Use the filter options to narrow down the specific data you want to delete:
- Customer: Type or select specific customer(s)
- Product Group: Filter by product group
- Date Range: Set "Starts After" and "Ends Before" dates
- Revenue Source: Filter by specific source
- Click Search to display only the filtered results
- Review the filtered data to confirm these are the entries you want to delete
- Click the checkbox in the header row to select all filtered results
- Click the trash can icon to delete the selected entries
- Confirm the deletion when prompted
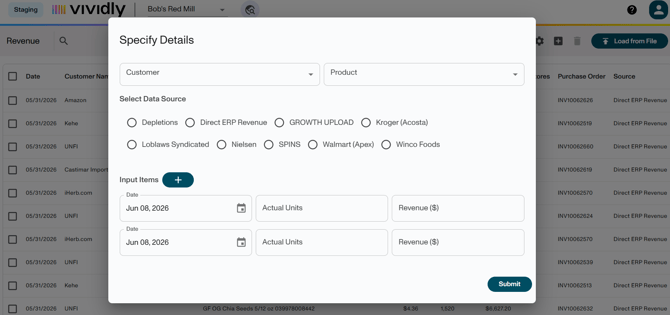
LAST STEP: Create single revenue lines to correct!
-
Navigate to Business > Revenue Dollars
-
Click on + icon
-
Add the following details:
-
Customer
-
Product
-
Revenue Source
-
Input items. Each with:
-
Date
-
Actual Units
-
Revenue ($)
-
-
-
Click on Submit when done
Pro Tips
- Always download your revenue data before performing any bulk deletions
- When deleting to re-upload corrected data, it's cleaner to delete the old data first rather than risk duplicates
- If you're correcting pricing that affects revenue calculations, delete the affected revenue and re-upload so the system recalculates properly
- You can adjust the number of rows displayed per page (typically 15, 50, or 100) to make selection easier for bulk deletions
- The system will prevent you from deleting revenue data that is tied to closed promotions or other dependent data
- If you accidentally delete data, you'll need to re-upload it—there is no "undo" function, which is why downloading first is critical