Overview
Creating product groups one by one is slow and error-prone, especially when onboarding large catalogs or restructuring hierarchies.
You can now add multiple product groups at once by uploading a CSV or Excel file from either the Product Groups or Product Hierarchies page. This saves significant time during initial setup, large catalog updates, or when restructuring hierarchies.
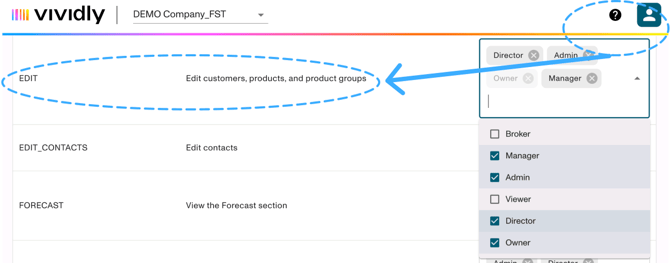
This feature requires the "Edit customers, products, and product groups" permission that an admin can set up in Settings.
Step 1: Verify Your Permissions
Before you begin, confirm you have the required permission:
- Click your profile icon at the top-right of the screen
- Go to Account Settings
- Navigate to Permissions
- Verify that "Edit customers, products, and product groups" is enabled
- If not, contact your system administrator to request this permission
Step 2: Download the Sample Template
- Navigate to either:
- Manage → Product Groups, or
- Manage → Product Hierarchies
- Click the upload/import icon or Load from File button
- Click Download Sample Template
- Save the template file to your computer
Step 3: Prepare Your Upload File
Open the downloaded template and fill it out with your product group data.
Step 4: Upload Your File
- In the Product Groups or Product Hierarchies page, click the upload/import option
- Choose Upload New File (not "Update Existing")
- Drag and drop your completed file, or click to browse and select it
- Click Next Step to proceed to validation
Step 5: Review Field Mapping
The system will display a field mapping screen:
- Verify that each column from your file is correctly mapped to Vividly fields
- If any field is incorrectly mapped, use the dropdown to select the correct Vividly field
- Tip: If you used the sample template, all fields should auto-map correctly
- Click Next Step when mapping is complete
Step 6: Confirm Upload
- Type your name to confirm you are ready to upload
- Review the confirmation message showing how many product groups will be created
- Click Upload or Next Step to create the product groups
- Success! If you see confetti 🎊, your upload completed successfully
Step 7: Verify Product Groups Were Created
- Navigate back to Manage → Product Groups
- Search for your newly created product groups by name
- Click on each group to verify:
- Name and Alt Name are correct
- "Used for Pricing" toggle matches your upload
- Product Margin is set correctly (if applicable)